Sessions are the dates, days, and times associated with an activity. They can be considered schedules for your activities. ActivityHero gives you powerful tools to set up sessions for your activities.
Create a New Session from an Activity
Build the Session
Expert Setup
Create a New Session from an Activity
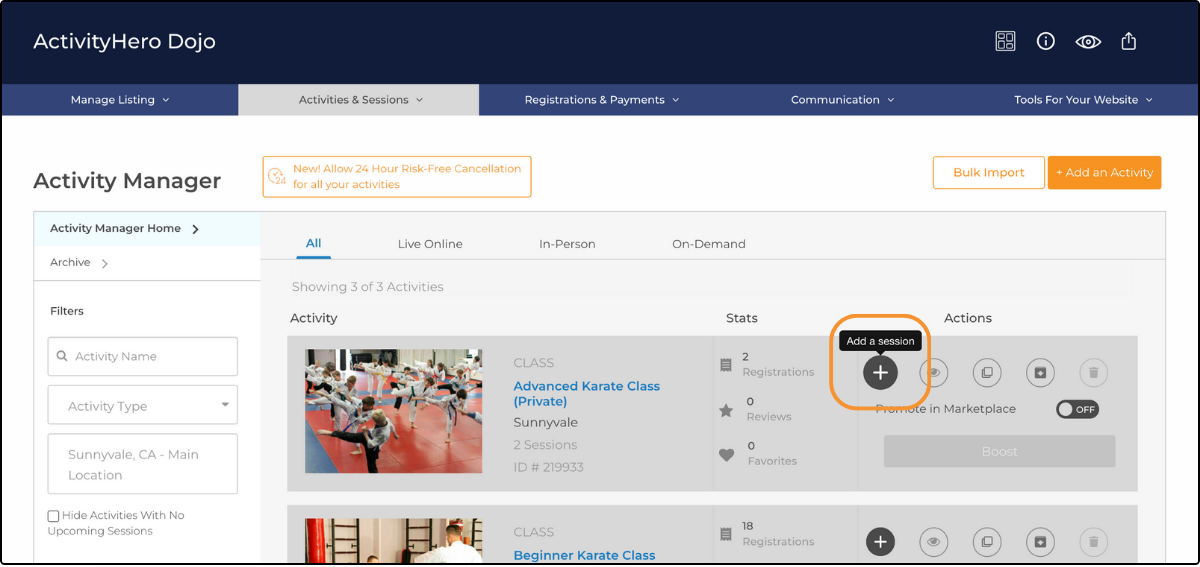
On your Dashboard, navigate to Activities & Sessions > Activity Manager. Find the activity you want to create a session for and click the plus icon.
Build the Session ↑
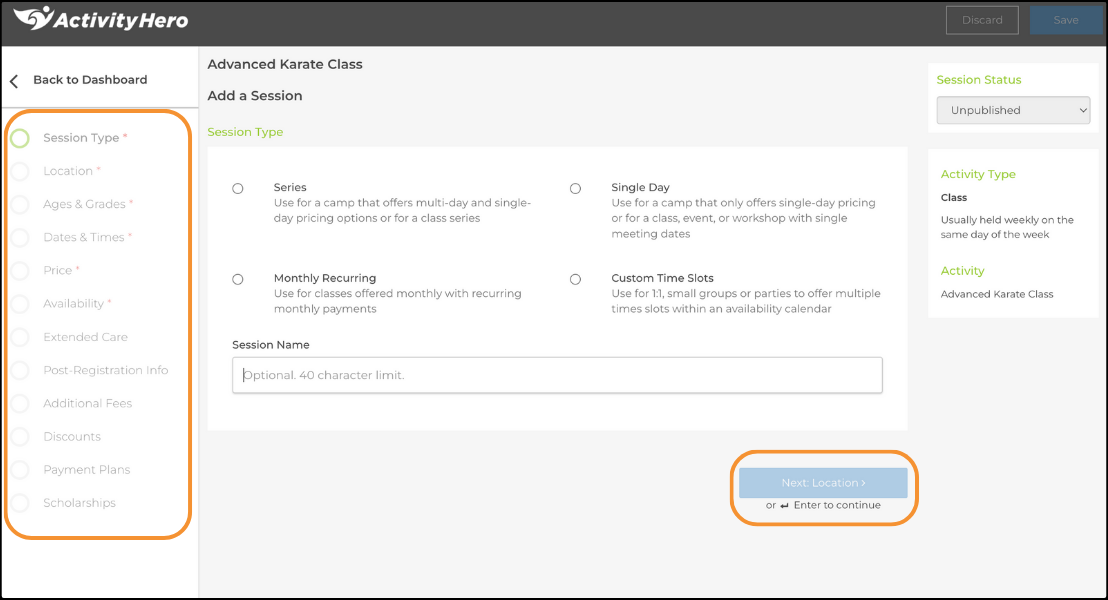
You go through the steps to create a session. The menu on the left displays each step, with the required steps marked by a red asterisk. The option at the bottom becomes active once all required fields are completed. Click it to proceed, or use the Enter key on your keyboard.

At any time while creating your session, you can use the options at the top of the page to Preview, Discard, or Save.
Preview - review how the session looks in the ActivityHero Marketplace.
Discard - end the session creation process without saving any of the progress.
Save - end the session creation process and save all progress.
Session Type
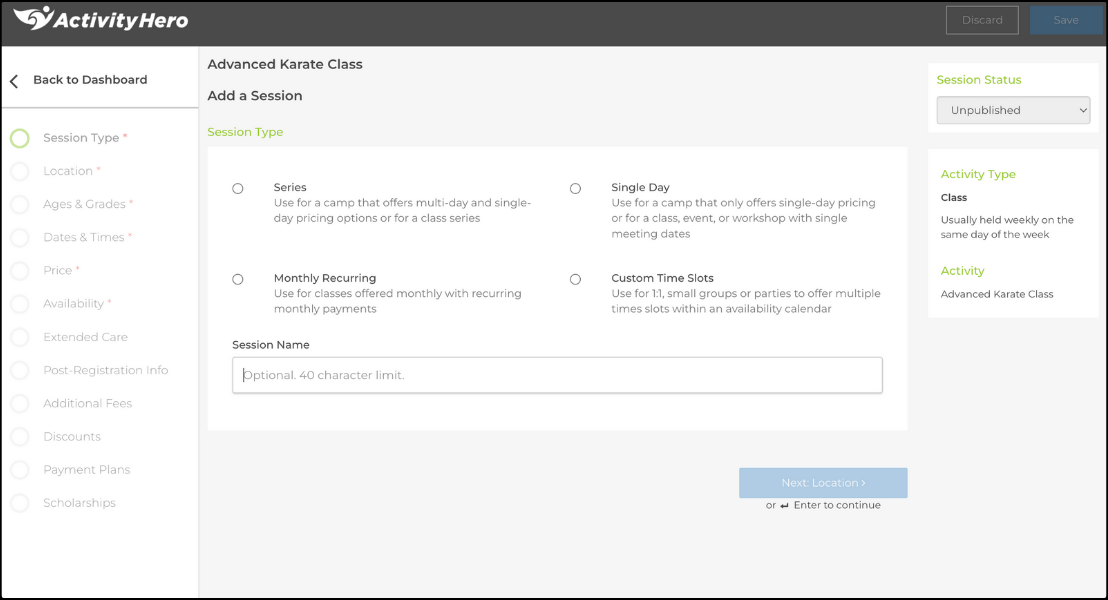
The first step is to name your session and select a session type. The name of the session appears on activity pages and widgets. Make sure the description is accurate but not too long. It also should not repeat information already displayed like times, ages, and grades. Some examples of good session names are names for membership sessions or skill level (e.g., beginner, intermediate, advanced). Select from the session type options below.
Series - Use for a camp that offers multi-day and single-day pricing options or for a class series
Single Day - Use for a camp that only offers single-day pricing or for a class, event, or workshop with single meeting dates
Monthly Recurring - Use for classes offered monthly with recurring monthly payments
Custom Time Slots - Use for private 1:1 sessions, small groups, or parties to offer multiple time slots within an availability calendar
Location
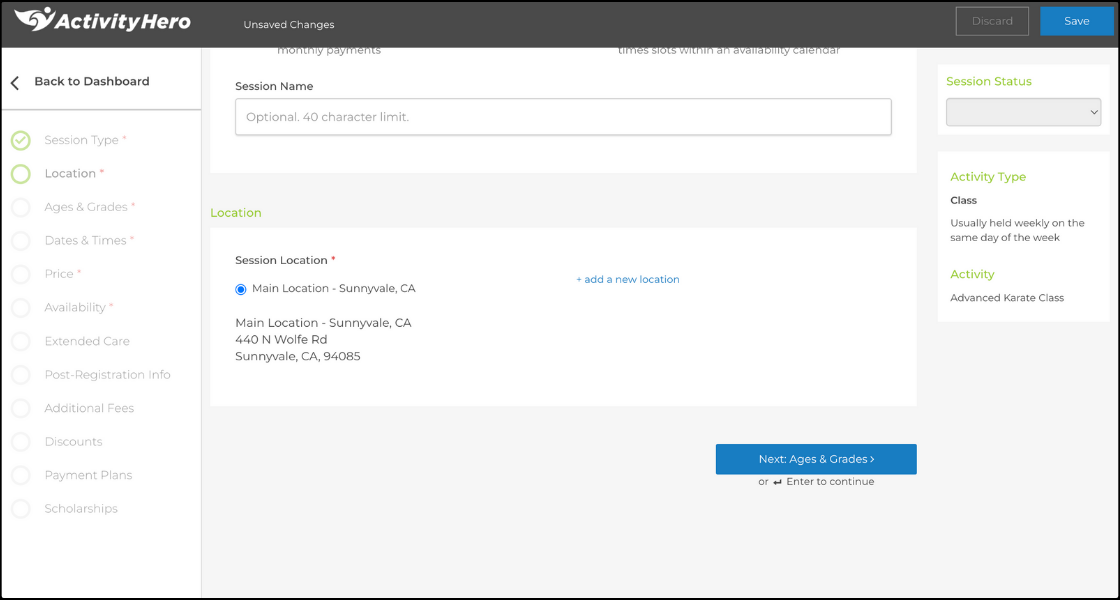
Select the location for the session. All of your locations are available to select from. To create a new location for this session, click + add a new location and complete the required fields to save.
Ages & Grades
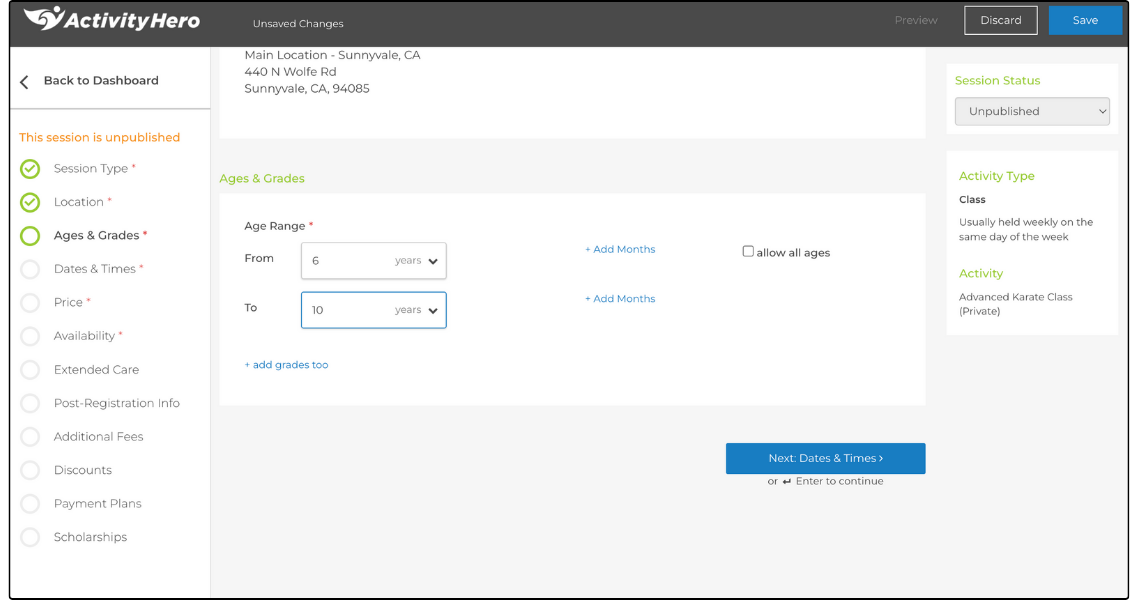
Using the options provided, select the appropriate age range for the session. You can specify age by year and add months if needed. You can also add grade levels by selecting + add grades too. If you add grades, ActivityHero verifies that the participant matches the grade of the session instead of the age. If there are no age restrictions, select allow all ages.
Dates & Times
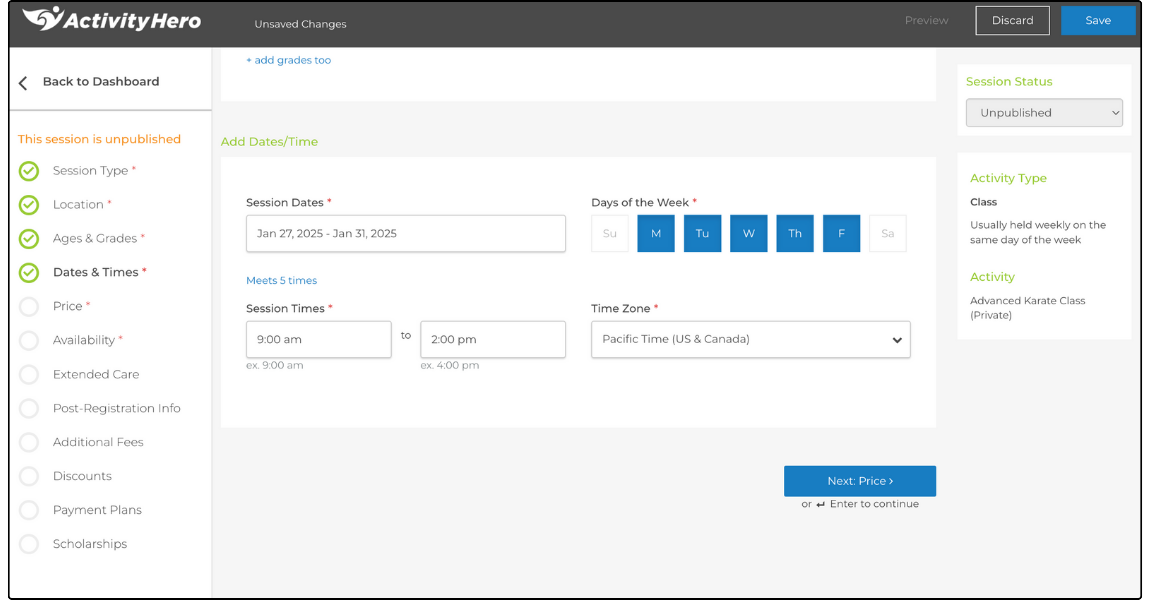
Add the date and time details for the session:
Session Dates - Click the session dates field and select the first and last day of the session on the calendar.
Days of the Week - Select the days of the week when the session meets.
Session Times - Set the session's start and end times in the designated fields to define its duration.
Time Zone - Select the applicable time zone from the dropdown menu.
Price
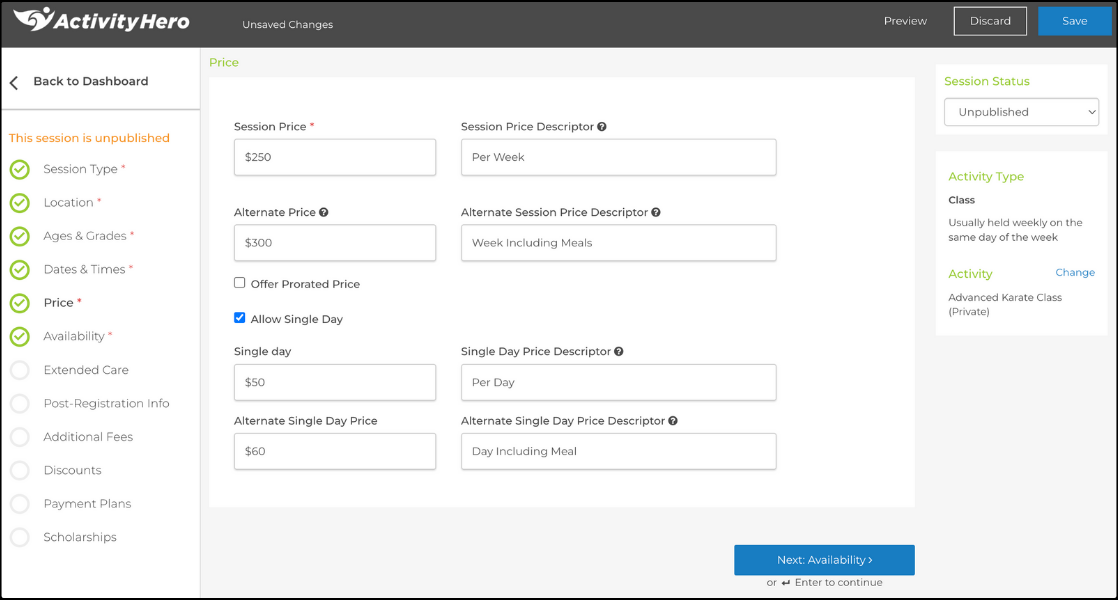
Type the price for your session. If there is only one pricing option, a Session Price Descriptor is not necessary since the price applies to that session by default. If you offer multiple pricing options, you can add an Alternate Price. Type the alternate price and use the Alternate Session Price Descriptor to clarify what it includes. The alternate price is not intended for discounts. For more information on discounts, see our help article. These descriptors help families understand the different pricing options.
Offer Prorated Price - If your session has already started and you want to allow late registrations, this option calculates the price based on the remaining sessions. The per-day calculated price is displayed as a reference for how late registration fees are determined.
Allow Single Day - Selecting this check box enables single-day pricing. You can type a Single Day Price, Single Day Price Descriptor, Alternate Single Day Price, and Alternate Single Day Price Descriptor. Use these the same way as session pricing to clarify different options for single-day registrations. If you only want to offer single-day pricing, remove the session price and save only the single-day pricing. ActivityHero then displays only the single-day pricing option.
Availability
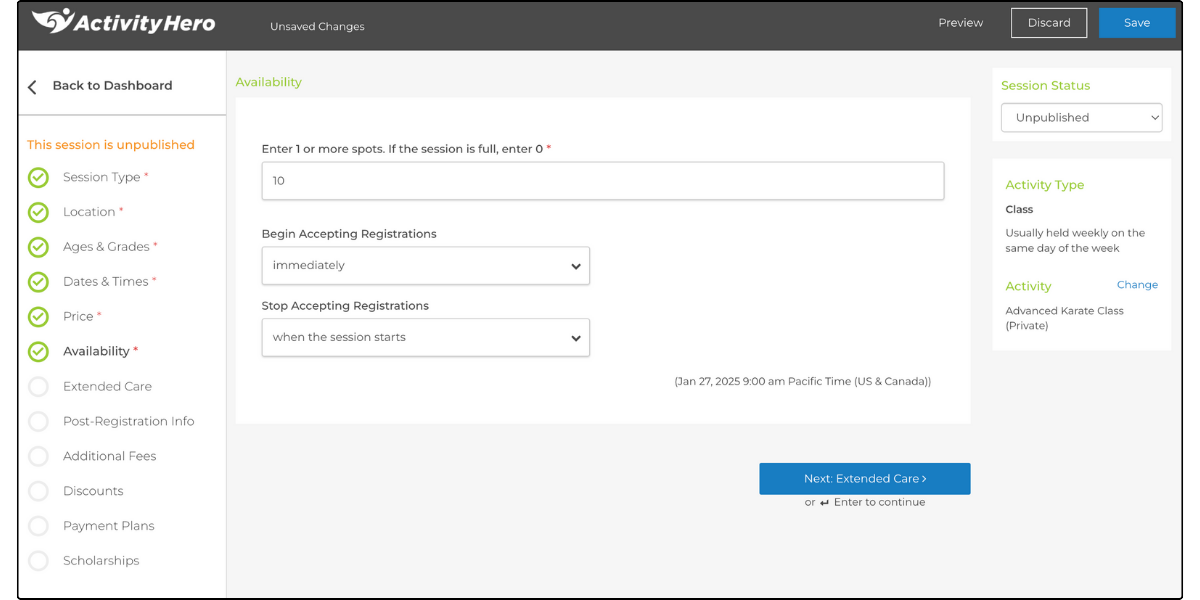
The Availability settings allow you to set the number of spots for your session and determine how long registrations are accepted.
Spot Count - Type the number of spots available for registration. If you type 0, the session is marked as full, and only the waitlist option is available. You can update the spot count for individual days after setting them. From your dashboard, navigate to Sessions & Content Manager, find the session, and click Spots Available. A spot count is displayed for each day, which you can edit separately.
Begin Accepting Registrations - Select when registrations open from the dropdown menu:
- Immediately - Registration opens as soon as the session is published.
- At a Specific Date and Time - If selected, a date and time field appears. Registration opens at the specified date and time.
Stop Accepting Registrations - Select when registration should close from the following options:
- When the session starts or when the session ends - The date, time, and time zone are displayed in the bottom right corner for confirmation.
- Before the session starts or before the session ends - Select the number of days before closure and specify the exact time. The date and time in the bottom right corner update accordingly.
- At a Specific Time and Date - Manually set the exact date and time when registration closes.
Extended Care
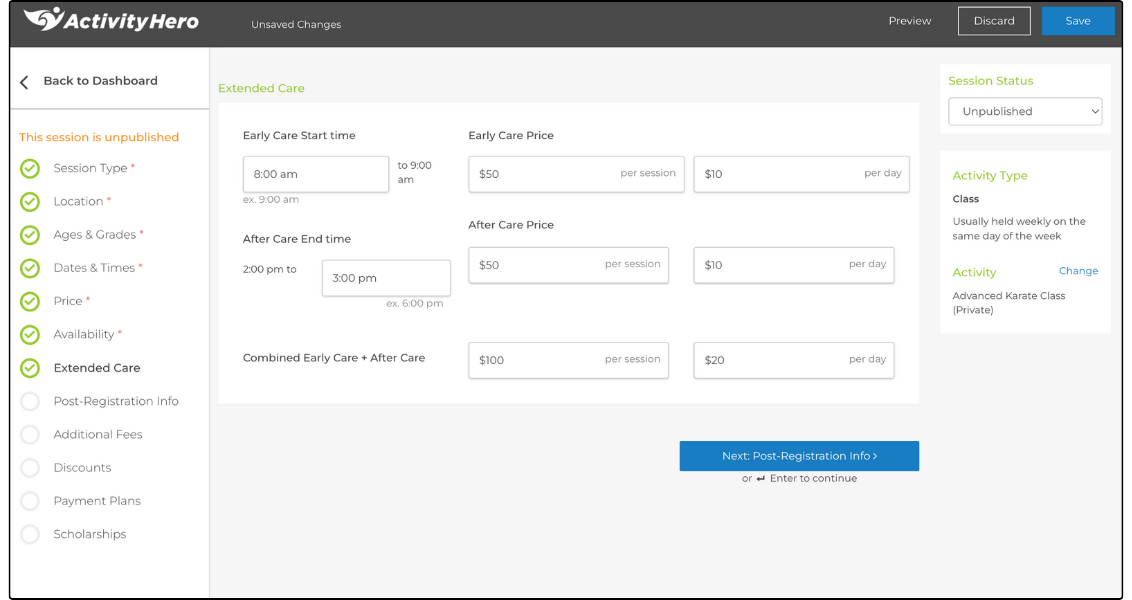
If you offer additional care times before or after your session, you can use the extended care options to display this to families.
- Early Care: This is for any time before the normal session hours. Type a time before your session starts, and the end time for early care is always the time your session begins. You can also type a price for early care, including a per-day rate if applicable.
- After Care: This is for any time after the normal session hours. Type a time for when after care ends, and the start time is always the end time of your session. You can also type a price for after care, including a per-day rate if applicable.
Additionally, you can offer a combined option for both early and after care, with its own session price and a per-day price. These prices can be the same or different from the ones already set. Adding this option allows families to select both early and after care services at the same time.
Post-Registration Info
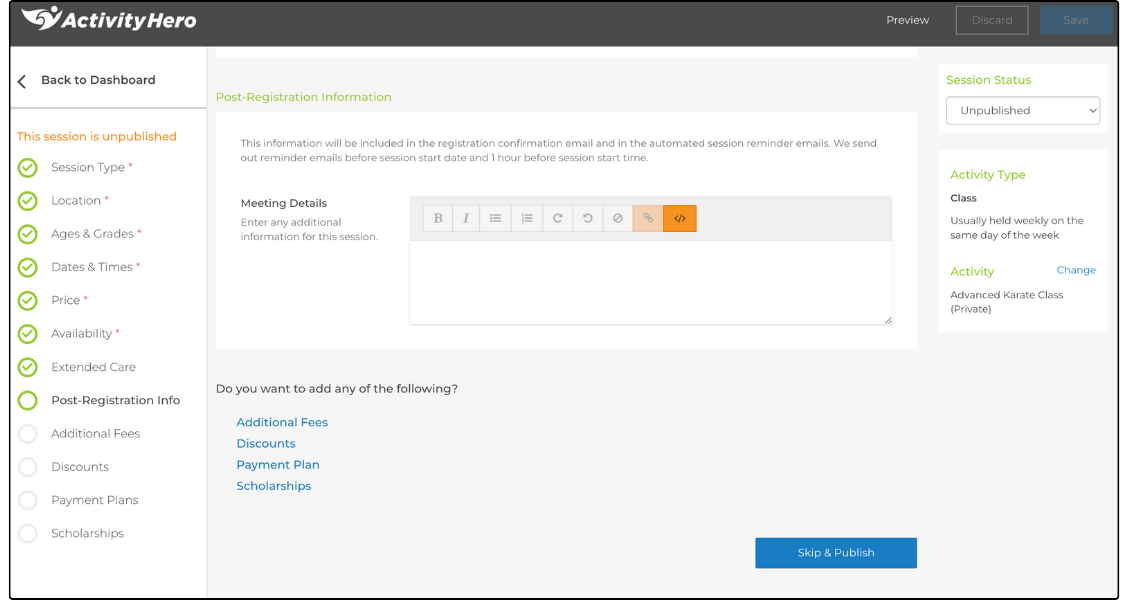
The Post-Registration Information section allows you to send additional information to families along with their registration confirmation email. This could include reminders about what to bring, specific meeting instructions, or any other helpful details.
The other options are not required to complete the session. If you are ready to finish, click Skip & Publish to complete the session creation.
If you would like to add Additional Fees, Discounts, Payment Plan, or Scholarships, click the links to continue. We also have articles that provide more information about these options, which you can find linked below.
Expert Setup ↑
Short on time? Have an expert from ActivityHero set up your listing to get you up and running quickly. Your listing is also optimized to maximize visibility and registrations. After you complete your payment, we will ask you for basic information to set up your listing (up to five activities or 30 activity sessions). To add Expert Setup, navigate to your Manage Your Plan page, select the Expert Setup check box, then click Confirm Your Changes in the top right corner.
Related Articles ↑
Was this article helpful?
That’s Great!
Thank you for your feedback
Sorry! We couldn't be helpful
Thank you for your feedback
Feedback sent
We appreciate your effort and will try to fix the article